9 minutes
Unit testing in python
Why should you write unit tests? Well, incase you’ve not heard - there’s this wonderful software development process called TDD (Test-driven development). Where the idea is that you write your tests first, and let that drive your development. The point is, you write a test that would initially fail, then write the code to get it to pass. Rinse and repeat until you’re happy with the result and/or it meets the spec.
This is where unit tests come in - what is a unit test? Well you could read the wiki entry - but if you’re short of time, a unit test is a very small test case written to test a very small piece of code, the smaller the better, really.
Ideally you should write tests to cover as many (all is subjective and can technically never be achieved - all we can try do is be perfect, we’ll never be perfect though) possible scenarios as possible.
Lets start off with something simple - simple in terms of unit testing. Python has a built in statement ‘assert’. Where the idea is - you assert a Boolean value, based on that either show a message, or do nothing. This is the basic premise of unit testing. Evaluate something is true, if not - let me (the developer) know.
So what are some things you would test? Some relevant business logic perhaps ? Well sure. What about something irrelevant for demonstration purposes ? Heck yeah.
The following is a codewars challenge. Where you’re tasked with writing a function that takes a string - and whenever you encounter an octothorpe (#) you backspace a character.
Some examples:
"abc#d##c"      ==>  "ac"
"abc##d######"  ==>  ""
"#######"       ==>  ""
""              ==>  ""
"abc#d"         ==>  "abd"
Again, the idea is to write your unit tests first, run them - if they fail, fix the code/ implement the logic - until you have passing tests, at which point - you can refactor your code to improve upon the implementation, but always check that your code passes. This being said, here are some basic unit tests making use of the built in python statement, ‘assert’.
def clean_string(s):
    pass

if __name__ == "__main__":
    expected = "ac"
    testData = "abc#d##c"

    got = clean_string(testData)

	# This is the result that gets checked
    assert got == expected, "The values did not match"
When we run this, we get the following:

The important thing to note, is the error message, the type returned is an AssertionError. We see that the error message details contains the message we defined in our assert statement.
If we now implement the logic for this method:
# The implementation isn't that important.
def clean_string(s):
    if ('#' not in s):
        return s

    idxHash = s.index("#")
    if idxHash == 0:
        return clean_string(s[1:])
    else:
        return clean_string(s[0:idxHash-1] + s[idxHash+1:])

if __name__ == "__main__":
    expected = "ac"
    testData = "abc#d##c"

    got = clean_string(testData)
	print(got)

    assert got == expected, "The values did not match"
We’ll see the following:

I’ve printed out the result of the function call, but beyond that - there are no assertion errors We can be confident that there aren’t any errors in our implementation ? Well, sort of, we’re not really testing every possible case, such as the ones we listed above. So - we just add all the possible values and re-run our code ?
# omitted implementation of clean_string(str) -> str

if __name__ == "__main__":
    expected1 = "ac"
    testData1 = "abc#d##c"

    got1 = clean_string(testData1)

    assert got1 == expected1, "The values did not match"

    expected2 = "ac"
    testData2 = "abc#d##c"

    got2 = clean_string(testData2)

    assert got2 == expected2, "The values did not match"

    expected3 = "ac"
    testData3 = "abc#d##c"

    got3 = clean_string(testData3)

    assert got3 == expected3, "The values did not match"

    # etc
Well, this certainly works (if we run it we see no assertion errors). But it starts to get slightly harder to organize our tests, and we sacrifice a ton of readability. What can we do about this ? Well - if you’re especially crazy (thank god for these sorts of people, they change the world), you might go ahead and write a fancy python module that handles unit testing. Or, instead of re-inventing the wheel, we can leverage of the pre-existing standard library, unittest module.
So, how does unittest differ from simple assert statements? Well, the basis of a unit test remains the same - you’re still writing function calls and asserting their results to confirm they are what you’d expect. However, you’re now able to split up your unit tests and your module logic (You could technically do this without making use of unittest). Now - when you want to setup a unit test, or a set of unit tests to test the functionality of your shiny new module - you’d create a file prefixed with the text test_ this way, you’re also able to auto-discover your unit tests instead of pointing to the exact file (this is also, still possible).
Lets say we want to setup a bunch of tests, we’ll start by creating a file in the same directory as our module, for now, called test_helpers.py because we’re testing our helpers.py file. This can be called anything - but remember, should be prefixed with the test_ identifier. In that file, we’ll import the TestCase class from unittest module so that we can extend that class with our unit tests. We’ll write some simple tests to see what’s what:
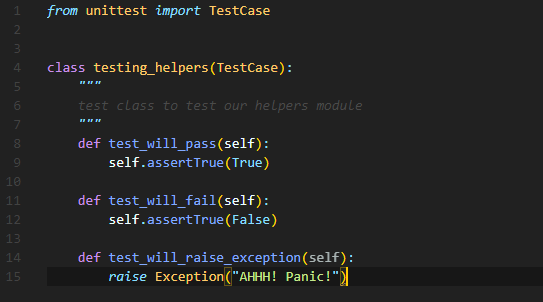
We have some random tests, the point isn’t what they’re testing - but rather what is shown when we run our unit tests, but how do we run our unit tests now? We use the following:
python -m unittest discover
Note - you can omit the discover from the above command as this is the default behavior.
Okay - now, why the random unit tests ? Well - to show the various elements of the output that you get from running your unit tests, and how to interpret them. If we run the above (and it’ll auto-discover our unit tests because we named our file with the test_ prefix), we’ll see the following:
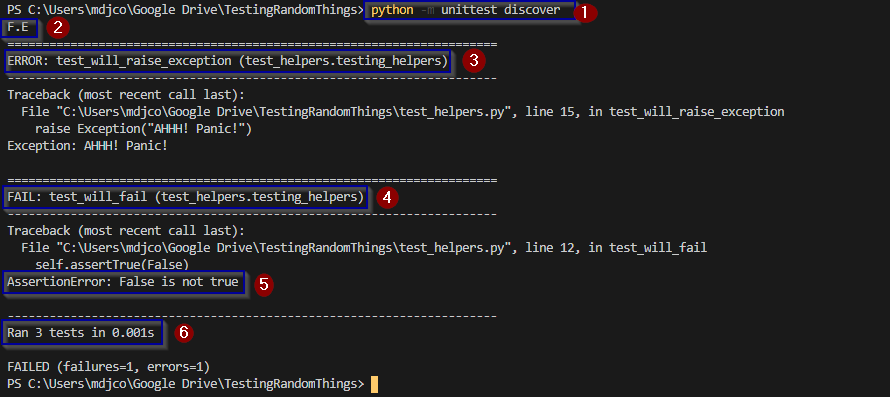
(Your terminal may display things slightly differently - I’ve also highlighted key points)
- This is us calling our unit tests, the command
python -m unittest discover. Remember, you can omit thediscoveras the default behaviour is to discover the test files. - This is a summary of the unit tests that have run. This might be slightly confusing at first, but there are essentially three outcomes from running your unit test, it passes - in which case, you see a period ‘
.’, it fails - in which case you’d see an ‘F’, or, lastly, your code throws an exception, in which case, you’d see an ‘E’. At a glance, you’re able to see if you have any failed tests, or tests that threw any exceptions. The ideal outcome would be to see a bunch of dots … - When your unit test throws an exception, you’d see this line - you would see the text
ERROR, followed by the name of the unit test, which is why it’s a good idea to name your unit tests in such a way that they’re identifiable. - When your test fails, you’d see this line. The text
FAILis something that you should get comfortable with if you are to embrace unit testing, and more specifically TDD. - The assertion error shows you why something failed, in our case, it’s because the value True is not equal to False, of course.
- You get a basic run time of your unit tests, I’ll discuss measuring performance in future posts!
Okay - one last point about basic unit tests with the unittest module that you may have noticed. When you write your test methods in your test class, you have to prefix your methods with test_ as well. The reason being, you might want to setup helper methods in your class, and you wouldn’t want those to run and execute as test cases.
Now, lets test our clean_string helper. We’ll need to setup unit tests to test for our base conditions given to us earlier,
"abc#d##c"      ==>  "ac"
"abc##d######"  ==>  ""
"#######"       ==>  ""
""              ==>  ""
"abc#d"         ==>  "abd"
Contents of our test_helpers.py file:
from helpers import clean_string
from unittest import TestCase

# Setting up a test class to test our helper function
# clean_string which backspaces when it encounters a `#`
class test_clean_string(TestCase):
    def test_empty_string(self):
        """
        A test to ensure that an empty string doesn't
        raise an exception.
        """
        test_data = ""
        expected = ""
        got = clean_string(test_data)

        self.assertTrue(expected == got)

    def test_basic_logic(self):
        """
        Simple test case where we check for the correct output,
        ensuring that the values match, and our method works.
        """
        test_data = "abc#d##c"
        expected = "ac"
        got = clean_string(test_data)

        self.assertEqual(expected, got)

    def test_end_with_octothorpes(self):
        """
        Testing if the user just backspaces a bunch
        """
        test_data = "abc##d######"
        expected = ""
        got = clean_string(test_data)

        self.assertEqual(expected, got)

    def test_just_octothorpes(self):
        """
        If a user just hits backspace, should
        only return an empty string.
        """
        test_data = "#######"
        expected = ""
        got = clean_string(test_data)

        self.assertEqual(expected, got)

    def test_simple_case(self):
        """
        Single backspace test
        """
        test_data = "abc#d"
        expected = "abd"
        got = clean_string(test_data)

        self.assertEqual(expected, got)
The above tests all of our possible cases, and now, if we run our unit tests:
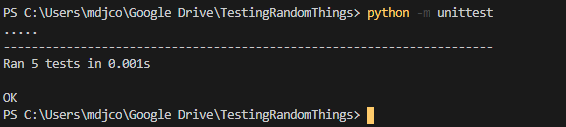
We can see by our summary line - we’ve only got passed tests, and we can be confident that our code is working!
If you read through the test cases, you might actually notice that in tests after the first one, we no longer make use of the self.assertTrue method to assert our tests, we instead use self.assertEqual . This, in our simple case acts in a very similar way - however, often you might want to test things like, “is this an element of this list that I’ve just computed”, or “Is the result of this function the correct type”. And in these cases there are built-in asserts that you can make use of. For a full list, refer to the docs.
Well - that’s all for now, in the future I will write about [pytest](https://docs.pytest.org/en/stable/) and the various sorts of things you can do with that module in terms of testing and setting up smarter tests with the various plugins that are available to extend pytest.
If you enjoyed reading this - please could you share this post! Thank you for reading!
References
- More on the assert statement can be found here.
- The
unittestmodule in pythons standard library, here. - The different assert methods found on the
TestCaseclass, here. - A really good article for reading more into testing things in python, can be found on realpython.com here. Note - this is more around the python module
pytest - Something not really covered in the post, but mentioned a few times,
pytest- and it’s documentation can be found here.